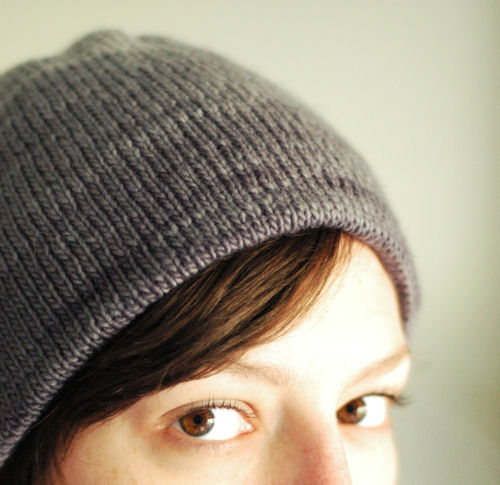
On a recent visit to Tolt, I picked up a ball of handpainted ombré yarn from Freia in the colorway “Cloud.” I think I knew pretty immediately that I wanted to make a hat with it, and if possible, a reversible, two-layer hat. I was almost able to eke the whole thing out of one ball of yarn, but I had to supplement with a little bit of extra yarn to finish it off (I used some leftover Kenzie for now, but I might try to find a better color match to complete the ombré effect and redo the crown on that side).

The timing is perfect, as it’s been windy and rainy in Iceland so far. This two-layer wool hat has already seen a lot of use. The color and the gradient effect both remind me of Iceland as well, bringing to mind volcanic ash, glaciers, snow, and clouds. In honor of that, I have named this hat Reykholt. Reykholt is a village in western Iceland that was once the home of Snorri Sturluson, the thirteenth-century Icelandic poet and historian who wrote the Prose Edda and Heimskringla, an anthology of Norwegian kings (it should surprise no one that I’ve been working my way through Nancy Marie Brown’s Song of the Vikings lately). Reykholt roughly translates as “smoke wood,” where reyk or “smoke” refers to the steam caused by Iceland’s geothermal activity (likewise with the Icelandic capital Reykjavík, which didn’t exist yet in Snorri’s time). It also feels fitting that the yarn comes from Freia Fibers; while the company may be named after the owner’s dog, it also shares a name with Freyja, the Norse goddess.
In any case, if you’d like to make your own, I’m including instructions below. It’s not exactly a pattern; it’s probably more of a recipe. But it’s simple and relatively easy to adapt.

REYKHOLT
Materials
1 ball Freia Fibers Ombré Sport Wool (pictured in “Cloud”)
extra sport weight yarn in a matching or contrasting shade
16″ circular needle in size needed to obtain gauge (suggested size: US Size 4 / 3.5mm)
1 set DPNs in size needed to obtain gauge (suggested size: US Size 4 / 3.5mm)
Gauge
22 stitches & 36 rounds per 4 inches / 10 cm
Finished dimensions
approx. 15″ / 38 cm from end to end with a 21.75″ / 32.5 cm circumference.
Instructions
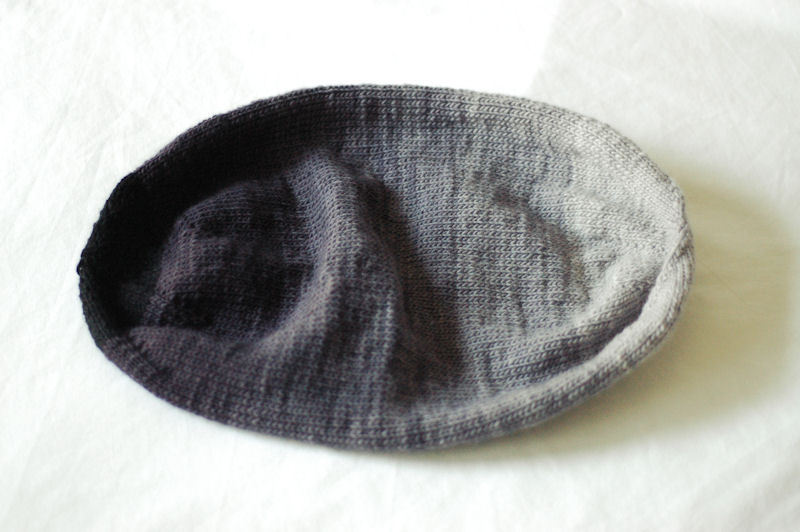
A note on the construction, before casting on: because this hat is two layers and reversible, you are in effect knitting two hats that happen to be seamlessly attached. This means that you will begin as if you’re knitting a hat using the top-down method, and instead of switching to a border and binding off at the brim, you’ll continue knitting as if working a hat from the bottom-up. The finished hat will look like sort of an oblong sack (pictured above) until you fold it in on itself so that the two crowns line up (this also means that once you’ve finished knitting it, you won’t be able to reach the purl side of the fabric).
Beginning with DPNs and ombré yarn, cast on 4 stitches. Divide stitches so that each needle holds one stitch.
Round 1: Kfb into each stitch. (8 stitches total)
You may find it helpful at this point to place stitch markers between each stitch (this will mark the location of your increases).
Round 1: Kfb into each stitch. (16 stitches total)
Round 2: [Kfb, k1] around. (24 stitches total)
Round 3: [Kfb, k2] around. (32 stitches total)
Round 4: [Kfb, k3] around. (40 stitches total)
Round 5: K all stitches.
Round 6: [Kfb, k4] around. (48 stitches total)
Round 7: K all stitches.
Round 8: [Kfb, k5] around. (56 stitches total)
Round 9: K all stitches.
Round 10: [Kfb, k6] around. (64 stitches total)
Round 11: K all stitches.
Switching to circular needle when necessary, continue working an increase round and a knit round until you have 120 stitches on the needles (you will have worked a total of 25 rounds). Once you have completed the increases, you can remove the stitch markers.
Next, work in stockinette, knitting all stitches, until the hat measures approximately 12″ / 30 cm from cast on point. (You can also eyeball it by folding the hat so that the crown from the cast-on side sits inside out and lining up the end of the increase section with your needles. Looking at the fabric below your needles, does it look like it’s time to begin the decreases? i.e. is it long enough? If yes, move on to the decreases below. If not, work a little bit more stockinette. You may want a shorter or longer hat than mine.) Keep in mind you may need to switch to your extra yarn at some point during (or before) the decrease section.
Decrease set-up round: *K13, k2tog, place marker. Rep from * to end of round. (112 stitces total)
Next round: K all stitches.
Decrease Round 1: [K to last 2 stitches before marker, k2tog, sm] around.
Decrease Round 2: K all stitches.
Repeat these two decrease rounds until 40 stitches remain, then continue working Decrease Round 1 only until 16 stitches remain. Removing stitch markers, K2tog around for 2 rounds. Break yarn and pull the tail through the remaining 4 stitches. Use a tapestry needle to thread the tail through to the inside.
—
I don’t plan to work this up into a fully sized pattern, but if you want to make a smaller or larger hat, it’s fairly easy to adapt! You’ll need to know your gauge – stitch gauge is more important than row gauge for the following instructions.
As written, the hat knits up at a gauge of 22 stitches per 4″, and at 120 stitches has a circumference of around 21.75″. If you want a smaller hat, for a child, for example, you can use your gauge to decide how many stitches to increase to. When you reach that point in the increase section, simply stop increasing and switch to stockinette! Likewise for the decreases.
You’ll also need to know the circumference you’re aiming for. If you have another hat of the recipient’s you can measure that, or use the measurement of a favorite child’s hat pattern (same goes for if you want to make a larger hat). Here’s what you’ll do:
1. Divide your stitch gauge over 4″ by 4 to get your main stitch gauge, or stitch gauge over 1″. We’ll call this number SG. (Counting stitches over a larger area will help you get a closer number for your stitch gauge than just counting the stitches in 1 inch.)
2. Note the circumference you’re aiming for. Will call this measurment circ.
3. Now multiply those two numbers:
SG x circ = stitch count
where stitch count represents the number of stitches you want to have at the widest point.
Because the increases are worked in multiples of 8, you may have to round up or down to the nearest multiple of eight, but this won’t make a huge difference.

Leave a comment