Happy Monday, everyone! This post took a little bit longer to put together than I wanted, but it’s finally ready to go! It’s a lot to read through, but I hope you find it helpful and please let me know if you still have questions about this topic by the end.
One of the most common problems knitters encounter when starting to knit in stranded colorwork is tight knitting. There are a few reasons for this, but the big one is that colorwork fabric by its very nature is less elastic than normal stockinette. This is due to the strands being carried across the back of the work (the “floats”) – unlike knit stitches, these strands don’t really stretch that much, so the stretch of the overall fabric you’re creating is much less.
That being said, there’s a great deal of variation in how stretchy colorwork fabric is from knitter to knitter. In fact, for a single knitter, there’s variation in how stretchy their colorwork fabric can be, depending on:
- what type of yarn the knitter is using
- how the knitter is holding/carrying the yarns
- how much space the knitter leaves between stitches
- whether the knitter is working on DPNs or circular needles
It’s important to consider the elasticity of your colorwork fabric, and to remember that it won’t necessarily correspond with your gauge – since gauge is measured with the fabric “resting” (i.e. not stretched out), there’s no indication of whether or not your knitting will be stretchy. This means you can “get gauge” for a pattern like Hearth Slippers but still have trouble with the fit if your fabric is too inelastic.
My first tip to help knitters keep their colorwork tension easy and even is always to stretch out the stitches that were just worked along the right needle as you’re working on your project. This gives you a chance to check your floats – are they too long? too short? – and it also allows you to evenly space out your stitches. You want there to be just as much space between stitches of two different colors as there is between stitches of the same color. This helps increase the elasticity. If you’re working on DPNs, you can do this at the end of each needle; if you’re working with circs (or over a large circumference, like a sweater yoke) you may want to check it at even intervals: every 8 stitches or so (or 6 stitches, or 10 stitches; whatever works for you!). You’ll be better able to adjust your tension as you go along, and you’ll catch things that need fixing without having to work backwards too far. (Side note: it’s always better to have floats that are a little long than a little short – you can always draw in the slack when you’re weaving in ends, but you can’t make a short float longer.)
 Stitches just knit spaced out along the right needle.
If you’ve tried this out and you still think your colorwork is coming out too tight, roll up your sleeves and get ready to try a few different methods, keeping in mind that some things may work for you and some may not; there’s a lot of trial and error in knitting! Here are some things to consider:
 Smoother yarns are closer to the top of the list, while stickier wools are towards the bottom.
1. Yarn choice. Because of the physical nature of wool, wool fibers like to grab other wool fibers (this is what causes felting when wool is exposed to heat/agitation). Some wools are “grabby” or “sticky” and some are much smoother (the method used to spin the yarn also affects this – worsted spun yarns are much smoother than woolen spun yarns). This always affects the knitted fabric you’re creating, but it affects colorwork even more. Some wools that are known for colorwork are very sticky wools, like Shetland wool or Lopi. This is also part of why steeking is so common in these places – sticky wools are unlikely to unravel when the stitches are cut. But because sticky wools are more likely to stay in place and the yarn is less likely to slide smoothly past other strands, the finished fabric is generally less elastic than it would be with smooth wools (and it can be tricky for colorwork beginners to achieve smooth results without puckering). Conversely, depending on the knitter, a very smooth yarn can also cause less elastic knitting because it will be easy to pull your stitches tight without meaning to as the smooth yarn fibers slide right past each other. The amount of elasticity you can achieve will also depend on how the yarn was spun and how many plies it has. A yarn like Quince & Co. Chickadee is smooth and springy, because it’s worsted spun with three plies. Lopi, on the other hand, is typically woolen spun and a single ply, which means it just won’t stretch as much. Some knitters will have an easier time with smooth wools while others will have an easier time with sticky ones. If you’re having trouble with tight colorwork you may want to try working with a different type of yarn or wool than you’ve used before to see if that makes a difference.
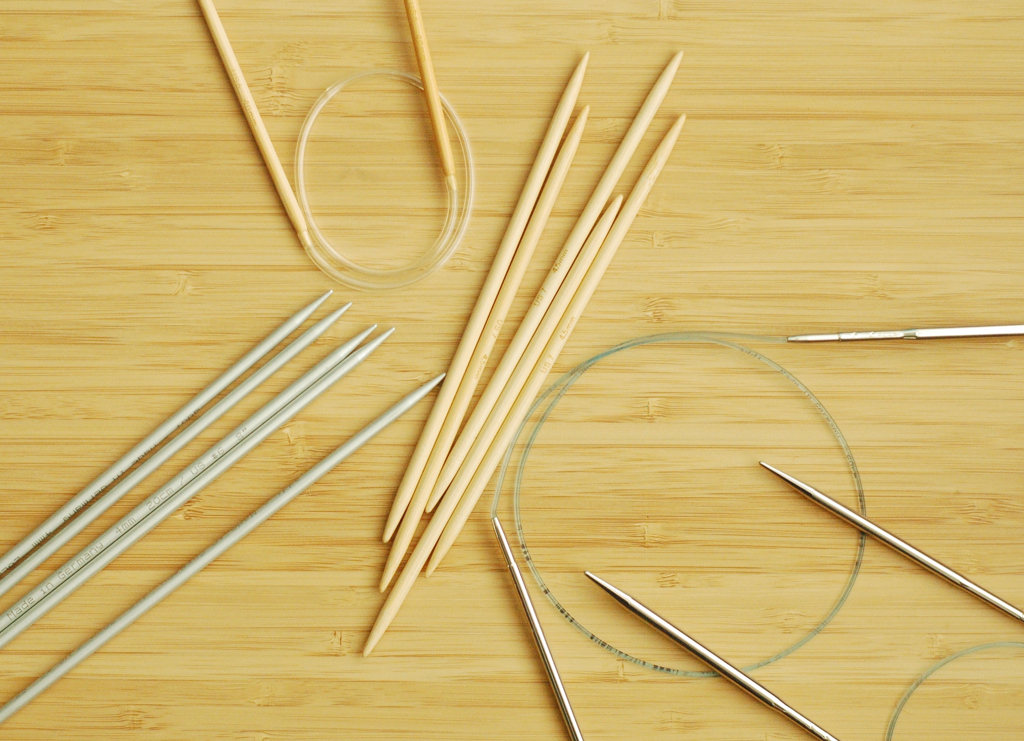
2. Needle type and needle material. If you’ve listened to episode one of the knit.fm podcast, you know that needle type can affect gauge. Needle material (e.g. wood, metal, plastic) and needle type (e.g. circular needles, double pointed needles) can make a great difference in colorwork – wood, metal, and plastic all have different levels of resistance, and gauge often differs between circular needles and double pointed needles (in general, knitters tend to end up with a tighter gauge on DPNs). Every knitter is different, so while some people knit tighter on wooden needles, others knit tighter on metal needles. Play around with different needle types if you’re not sure which category you fit into. If you’ve tried working colorwork on DPNs and found it to be too tight, try knitting a swatch on circular needles (either two circs or with the magic loop method) to see if that changes your gauge or elasticity. You can always try going up a needle size, as well – many people need to adjust needle size between stockinette sections and colorwork sections when using the same yarn.
To demonstrate the difference that needle type can make, I have two swatches that I knit: both are unblocked, but both were knit with the exact same yarn on the exact same needle sizes:
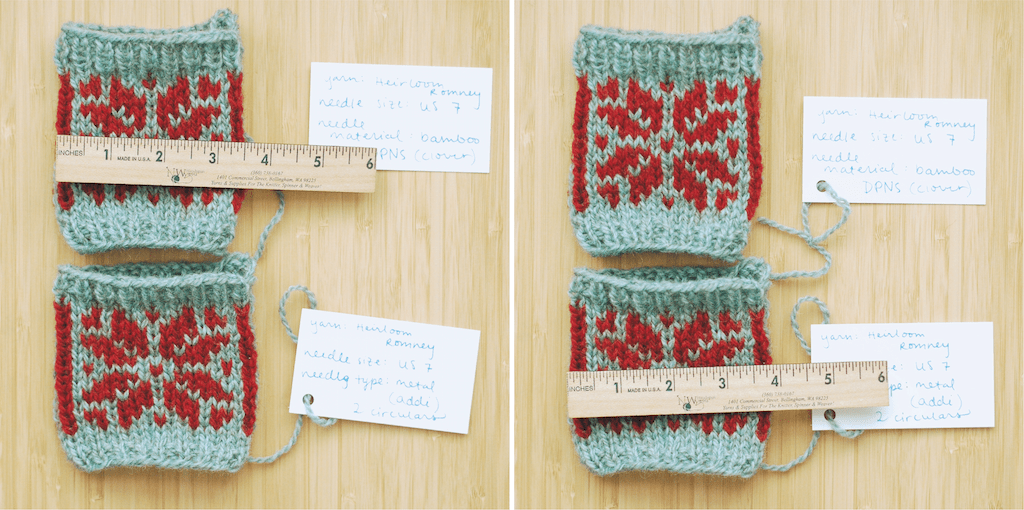
While the difference isn’t huge at first glance, and these measurements are pretty quick-and-dirty rather than precise, the swatch on top is noticeably narrower than the swatch on the bottom when both are measured flat. The swatch on top was knit on bamboo DPNs, while the swatch on the bottom was worked on two metal circular needles. The bottom swatch will definitely block out to the 8″ circumference I’m aiming for, but the top swatch will likely be too small. Knit a few small swatches with different needle types/materials and see if it makes a difference for you!
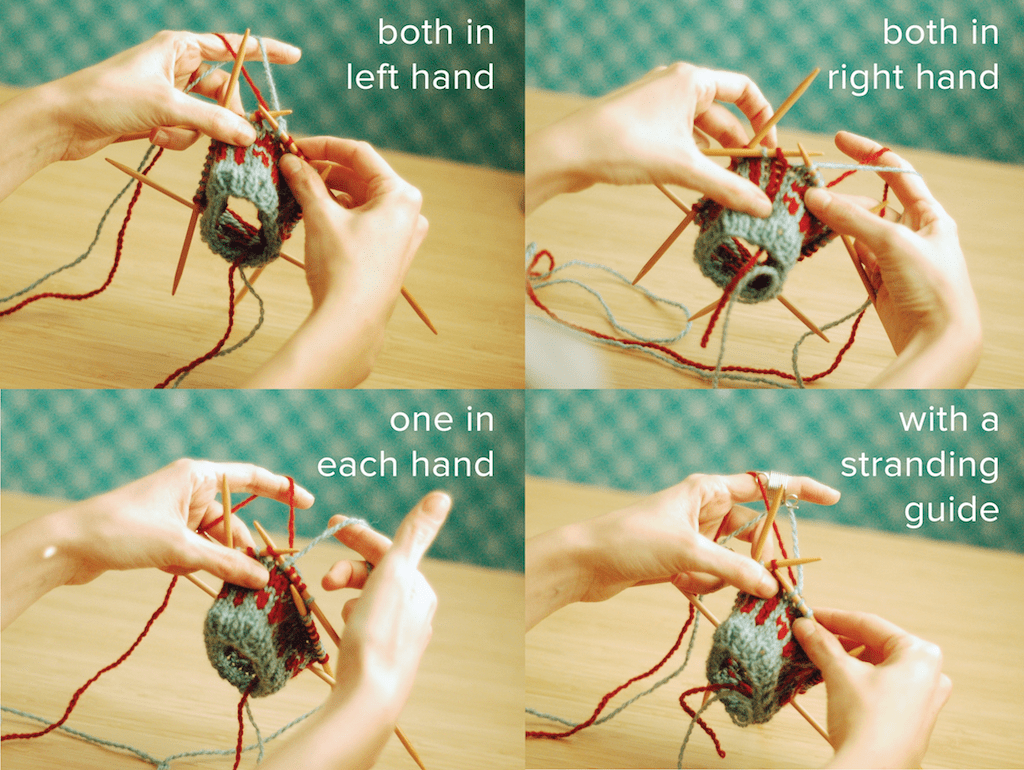
3. Carrying yarn. There are several different ways to manage carrying multiple yarns for colorwork knitting – carrying both yarns in the left hand, carrying both in the right hand, holding one yarn in each hand, carrying one yarn at a time, using a stranding guide, and the list goes on! If there’s one thing I’ve learned from my students, it’s that knitters are all over the map as far as which method works best for them. Many folks swear by the two-handed method while others prefer to carry both yarns in one hand (with or without a stranding guide). If you haven’t tried more than one method, you may not have found your perfect match yet! Remember that there are no rules here and experimentation is key – trying a new method often feels awkward at first, and your gauge may shift as you settle into it, but until you’ve given it a shot, how can you say it won’t work?
 Plastic and metal stranding guides
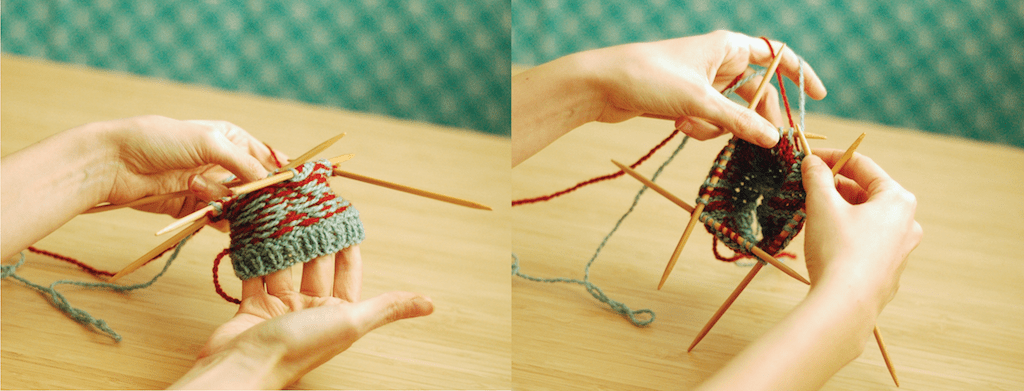
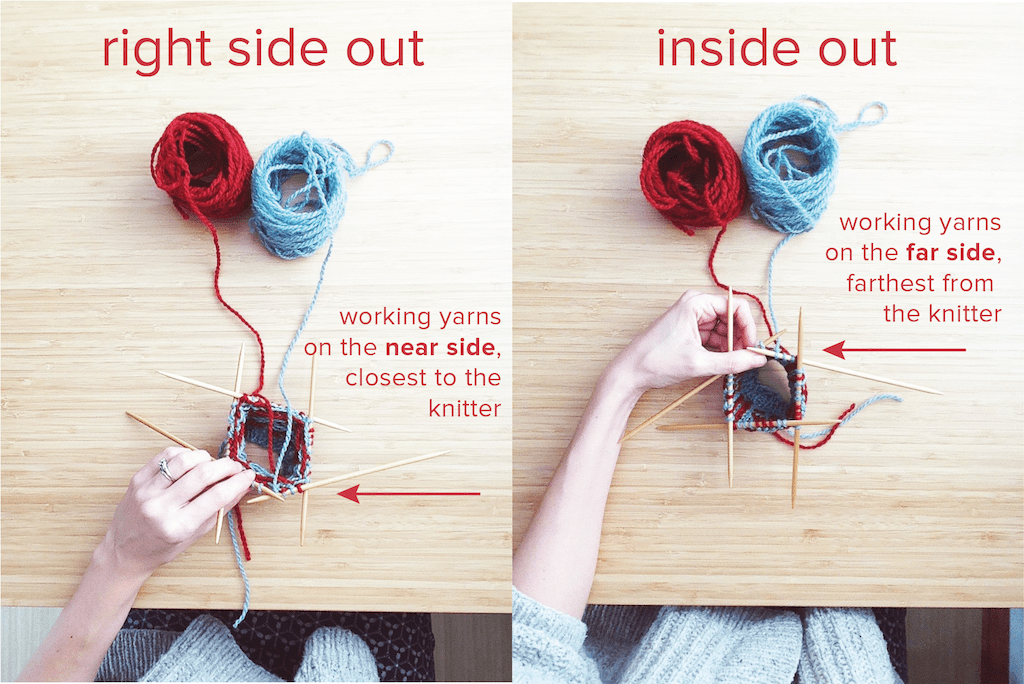
4. Knitting inside out. It may sound crazy, but many folks solve the tight colorwork issue by working their colorwork tubes inside out! The reason for this is that the outer circumference of a tube is larger than the inner circumference – perhaps not by much, but with the thickness of colorwork fabric, you’d be surprised – and turning your work inside out positions the floats on the outside of the tube (i.e. the larger circumference). This is more likely to keep them long, and it also keeps them visible, so you can constantly check your tension as you’re working. It can be tricky to visualize, but with the work turned inside out, you’re working on the far side of the tube, rather than the near side. It may take some trial and error to get the hang of it, but I’ve seen this method yield results for several people.
Here’s a bird’s eye view to help you visualize the difference between normal (right side out) circular knitting and inside out circular knitting. You can see where the working yarns meet the needles:
The biggest thing to remember is to be patient with yourself! If you’re tense, your knitting often shows it. Try out some of these techniques in the evening with a glass of wine or whatever else relaxes you. And keep in mind that mistakes are an important part of the process: we can learn from them.
If you have any other tips for easing up tight colorwork, I’d love to hear them in the comments!
Further reading / listening / watching:
If you want to explore this issue in further depth, I recommend checking out some of the following links to blog posts, videos, and books. (If you’re on a budget, don’t forget you can always check your local library for books.)
On different yarn types:
Knit.fm episode 5: Yarn [podcast]
Knit.fm episode 6: More Yarn [podcast]
Sue Blacker on Woollen vs Worsted mill spinning on wovember.com
The Knitter’s Book of Yarn and The Knitter’s Book of Wool by Clara Parkes
“Part Seven: Materials” from The Principles of Knitting by June Hemmons Hiatt
On working in stranded colorwork:
“Part Three: Decorative Techniques” from The Principles of Knitting by June Hemmons Hiatt, particularly pp. 256-266 (2012 edition)
Colorwork knitting inside out for socks from Melissa B
Tips, Tricks and Treats from Eunny Jang
On gauge:
Knit.fm episode 1: Gauge [podcast]
How to Measure Your Gauge in Knitting from Craftsy.com

Leave a comment