Photo via Quince & Co.
This tutorial is intended to help knitters making my Ebba pullover, but the information is relevant for steeking in general. Ebba is a drop shoulder pullover that uses steeks at the armholes to allow the body to be knit entirely in the round, so that the knitter need not purl in colorwork.
So, what is a steek, anyway? When you hear someone talk about steeking, we’re talking about the process of knitting a section of extra stitches which are vertically cut after the fact to create an opening (for an armhole or a cardigan front, for example). Historically, the word steek refers to the extra section of fabric itself – much like a selvage edge in sewing, the steek stitches aren’t intended to be seen from the right side in the finished garment. These days, we often use the word steek as a verb to refer to the whole process (and sometimes specifically to the act of cutting the steek stitches).

Traditionally, steeks are a Fair Isle technique – and when I use this term, I mean proper Shetland Fair Isle, not just stranded colorwork in general. Shetlanders weren’t the only ones cutting their stranded knitting to create openings; Norwegian and Icelandic knitting traditions both make use of cutting the fabric, to name two examples, but historically the processes were slightly different. Norwegian sweaters, such as the Setesdal lusekofte or the younger (but perhaps more recognizable) Marius sweater, were most typically worked without steeks (ie proper sets of steek stitches); rather the stranded pattern was worked continuously all the way around the top of the sweater, and the fabric simply cut open where the armholes would go (typically with some kind of reinforcement prior to cutting; machine sewing was the favored method during the 20th century).
While Ebba is obviously inspired by this traditional Norwegian construction, I opted to make use of steeks, because they help the knitter visualize where the sleeves will be positioned as they’re working on the body. I also find cutting into steek stitches, in their neat striped columns or checkerboard patterns, to be much easier and less scary than cutting into the pattern motif itself (and I have done both methods).
While cutting into your knitting can be scary, it really doesn’t have to be as long as you keep a few things in mind:
- Non-superwash wool is the absolute best thing to knit with if you’re planning to cut open your knitting. I wouldn’t recommend using superwash wool or other fibers; this is due to the nature of wool fibers and their tendency to stick together (the properties that make wool felt) that smoother fibers, or fibers treated to be superwash, generally lack. If you must substitute yarns for a non-wool, machine-sewn reinforcements are the safest way to make sure your knitting doesn’t unravel.
- Steeks are most often worked on sweaters, which you’re hopefully swatching for before you begin knitting anyway. When swatching for a sweater project, work a steek into your swatch so that you can practice your reinforcement method and then cut it open to test it out (you can also practice picking up stitches along the cut edge). Knitting a good-sized swatch will likely mean buying extra yarn, but you’ll have the knowledge that you can safely cut your knitting with your chosen yarn – to me, that’s worth the extra $10-20.
This tutorial uses a crocheted reinforcement – but don’t worry, you don’t need to know how to crochet to be able to work it! Here’s what you’ll need:
- a crochet hook similar in size (or slightly smaller) than the knitting needles you used (for example, if you knit the body of your sweater with US 5 / 3.75mm knitting needles, you’ll want a 3.75mm / US F crochet hook or smaller)
- yarn to work the reinforcement with – something smooth, strong (won’t break easily), and slightly lighter in weight works best, so I like to use sock yarn in a similar color to my project’s main color yarn
- a pair of small, sharp scissors – the sharper the scissors, the easier it will be to cut through the steek
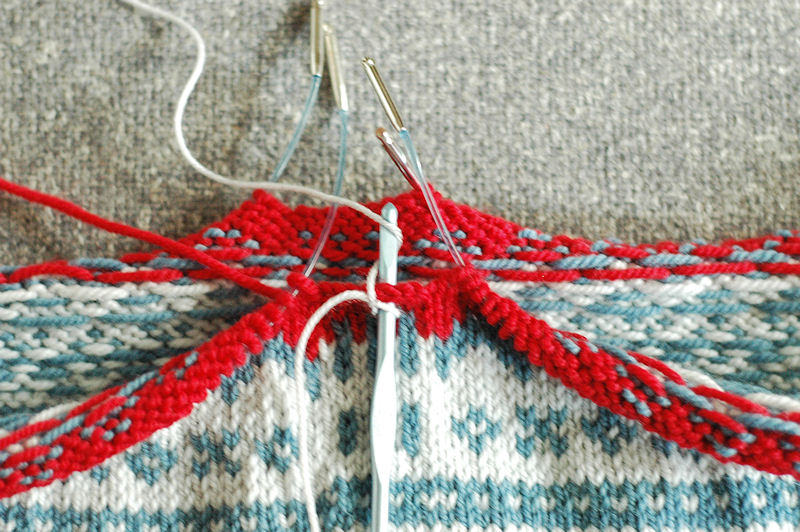
For Ebba, the steek stitches themselves are worked in 7 columns of stripes. We can visualize these like this:
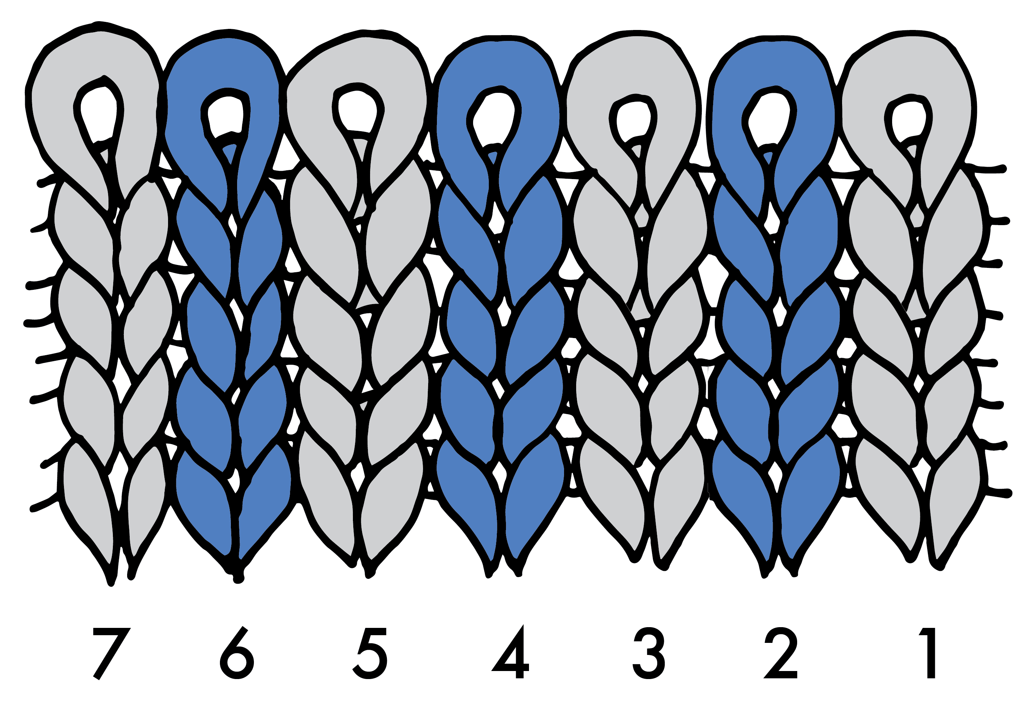
In this visualization, the cast on edge is at the bottom, and the bound off edge is at the top. I’ll be referring to these columns throughout the instructions, so pay attention to the column numbers and keep in mind I’ve numbered these from right to left, since that’s the direction they were knit in. It’s also important to note that each stitch is made up of two “legs” – each leg makes up half of the V that we see when we think of a knit stitch. I’ll be referring to these as the “right leg” and the “left leg” of the stitch.
PART 1: REINFORCEMENTS
Now, on to the instructions:
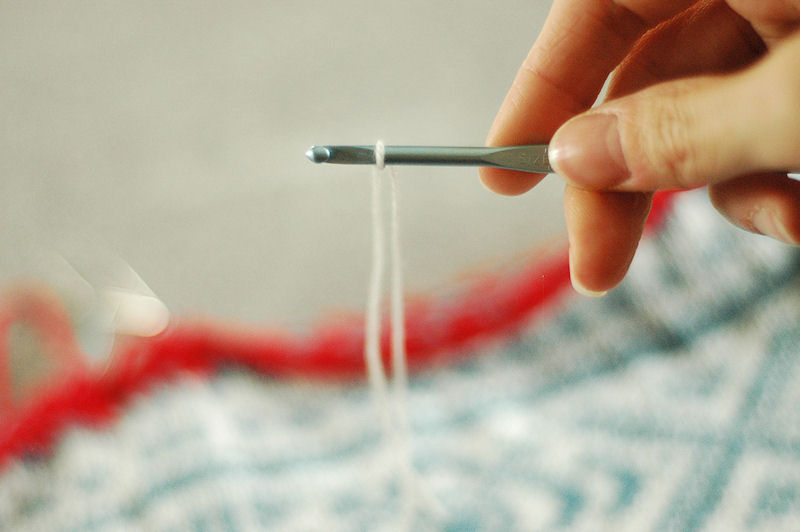
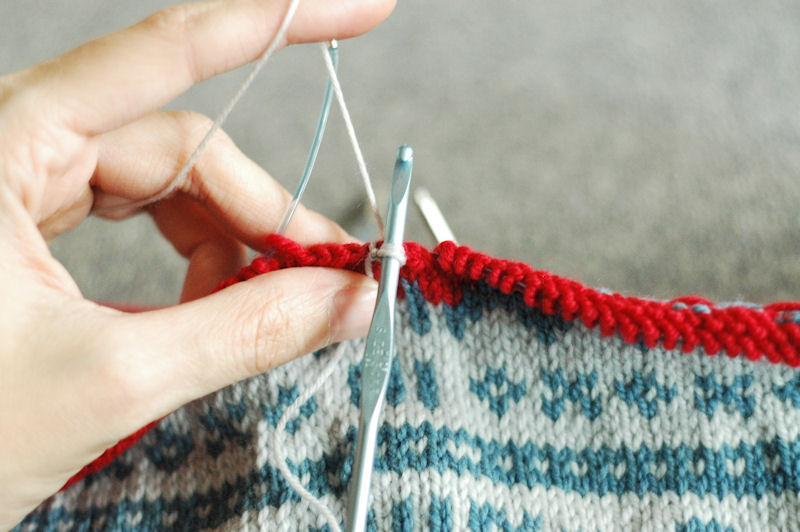
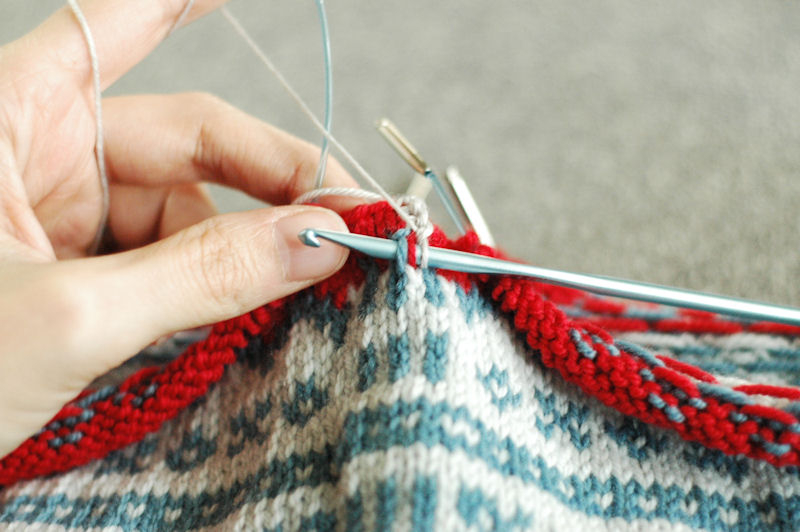
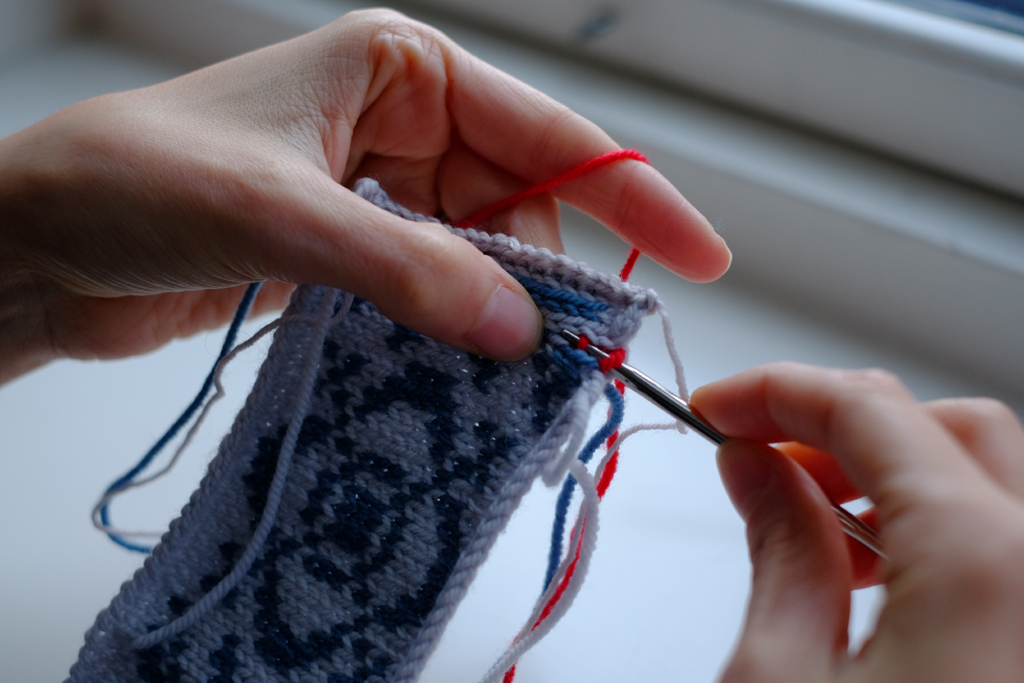
1. With your reinforcement yarn, tie a slip knot on your hook.
2. Insert your hook into the last stitch before the edge of column 3 (one stripe to the right of the center stripe). For Ebba, you’ll have to follow the line of the stripe up through the red (color C).
3. Wrap the yarn around the hook, then pull it back through the fabric and the slip knot to secure your yarn to the edge. You’ll now have one loop on your hook:
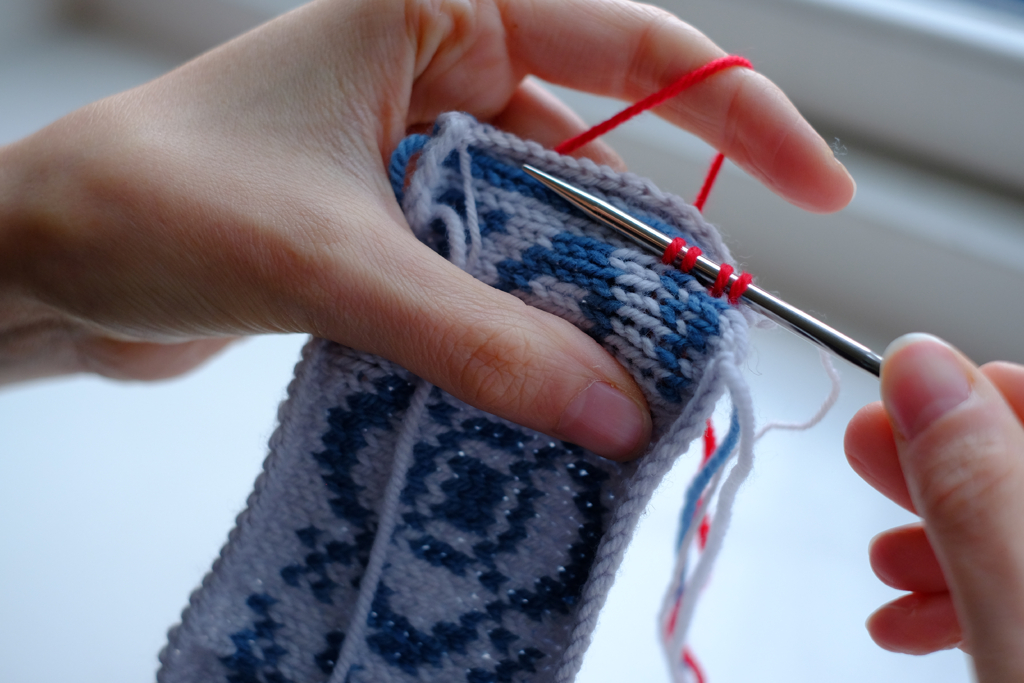
4. Next, insert the tip of your hook from right to left through the left leg of the column 3 stitch and the right leg of the column 4 stitch (the center stitch):
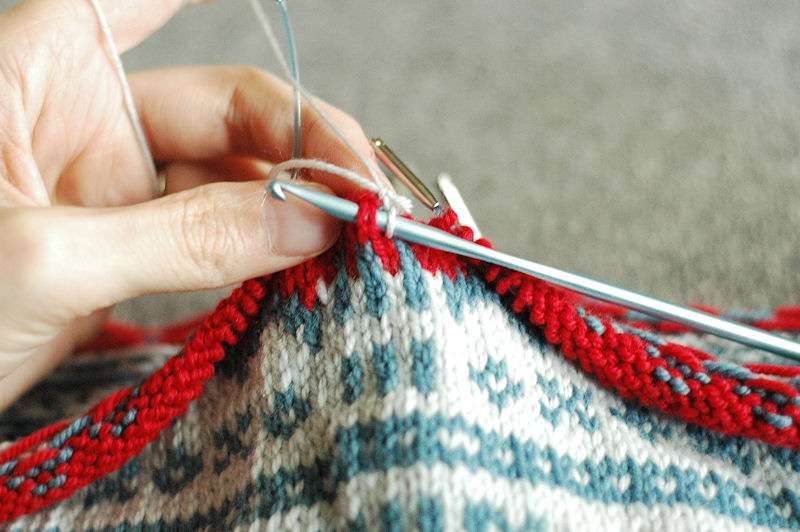
For Ebba, both legs will be in Color C here, but once we get into the stripes themselves, these legs will be two different colors which will make it easier to see. For a crocheted reinforcement, this is why striped columns of steek stitches work so well – the left leg of the right stitch and the right leg of the left stitch are different colors, which helps you make sure you’re grabbing the right legs!

5. Wrap the working yarn around your hook and draw it back through the two “legs” (in color C) but not through the last loop on the hook. This should give you two loops on your hook, as pictured above.
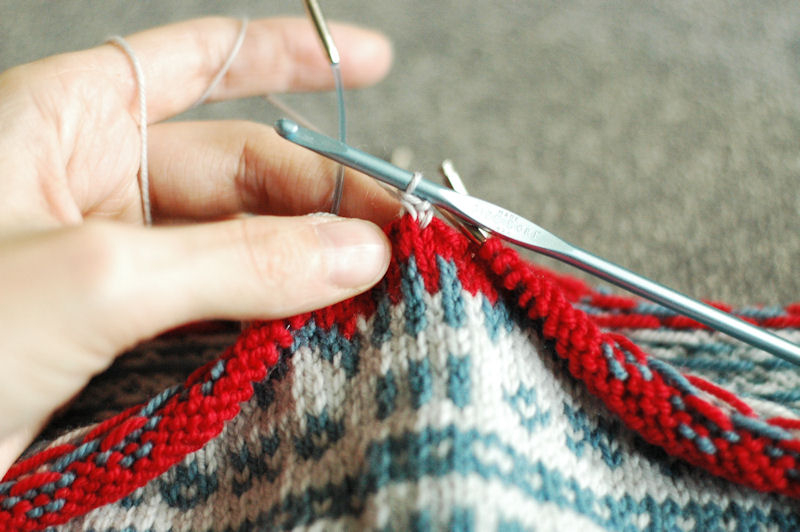
6. Wrap the working yarn around your hook and pull through remaining two loops. You’ll have one loop left on your hook now (as pictured above), and you’ve effectively just worked one reinforcement stitch!
Next, move down to the next row and repeat steps 4-6. By the time you get to the last row with color C, your two legs will look something like this at step 4:
And once you get past the red, your two color rows will look like this:
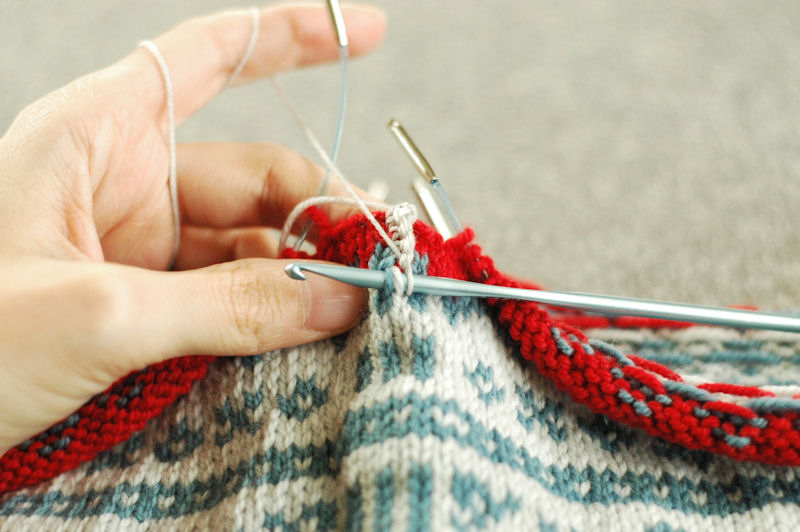
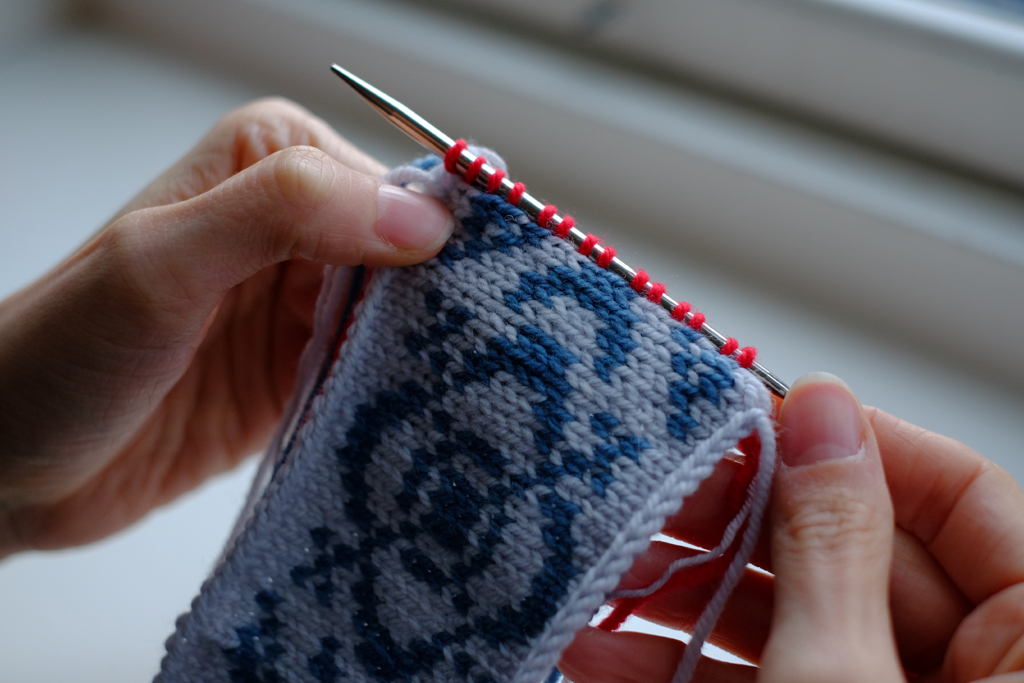
Continue working steps 4-6 for every row until you reach the bottom of your steek stitches.

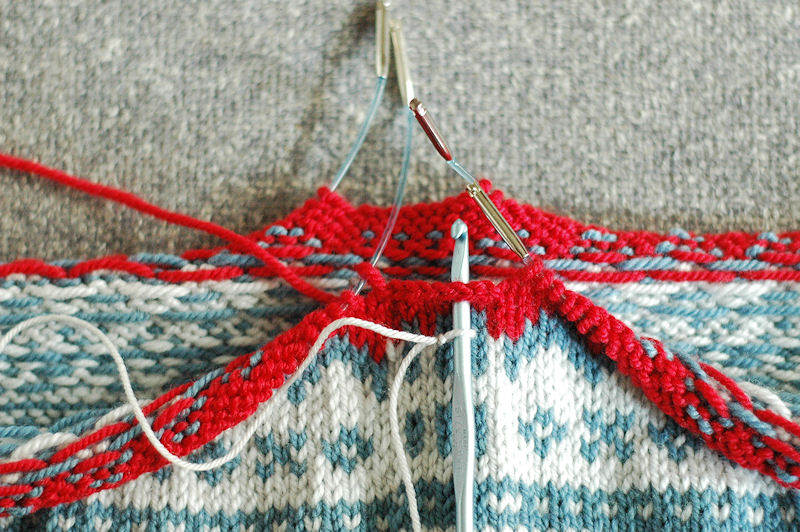
Secure your yarn through the center of the last stich of column 3 and break your yarn. When you’ve completed one whole side of the reinforcement, your work will look something like this:
Next, turn your work 180 degrees so that the line of reinforcement stitches you’ve just worked sits to the left side of the column 4 stitches. Tie a slip knot on your hook and fasten it (as in steps 2-3) to the center of column 5. You’re now ready to work a line of reinforcement stitches down the other side.

This time, for steps 4-6, you’ll be inserting your hook through the left leg of column 5 and the right leg of column 4. There shouldn’t be any stitches visible between the lines of reinforcement stitches after you work your way down – column 4 is neatly divided, with the legs on one side bound together with column 3 and the legs on the other side bound together with column 5. The lines of reinforcement stitches should be mirror images of each other.

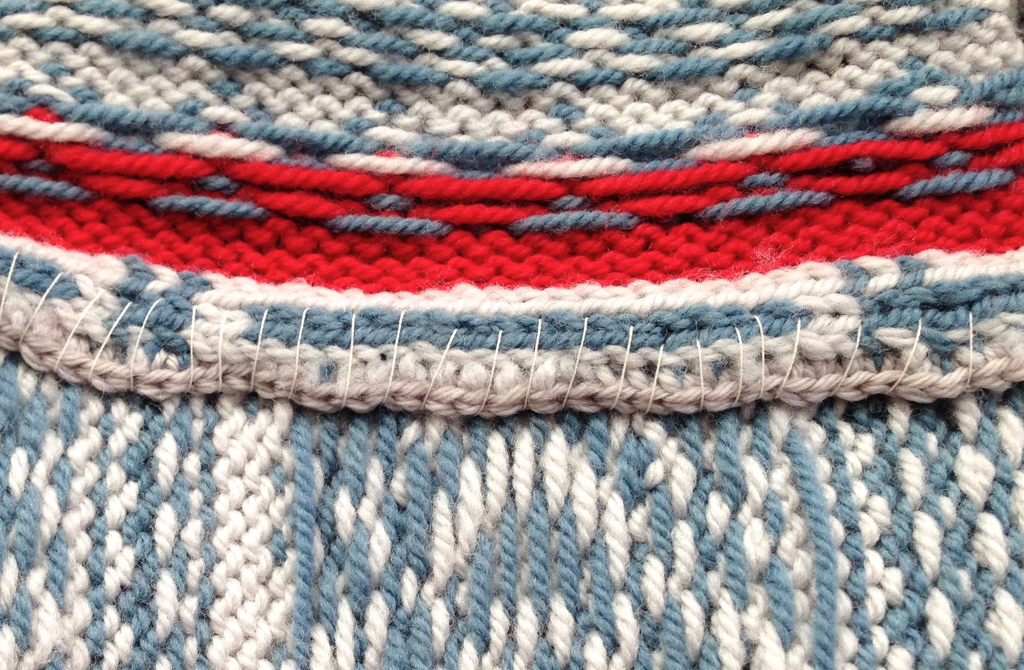
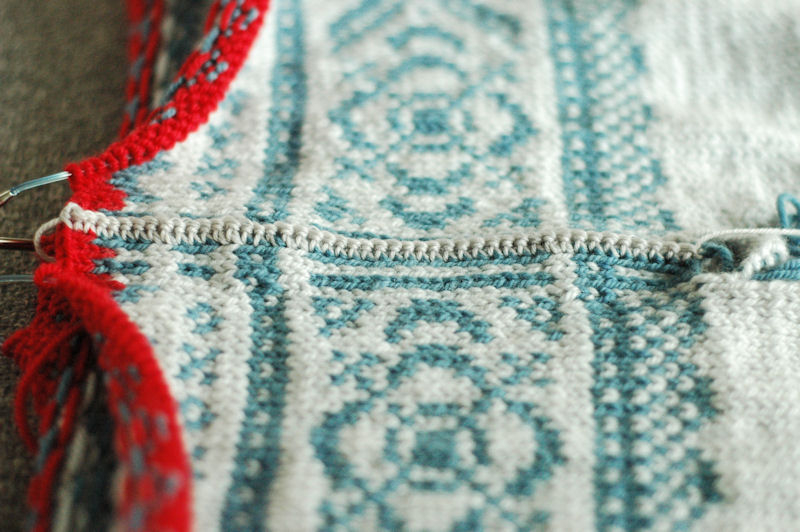
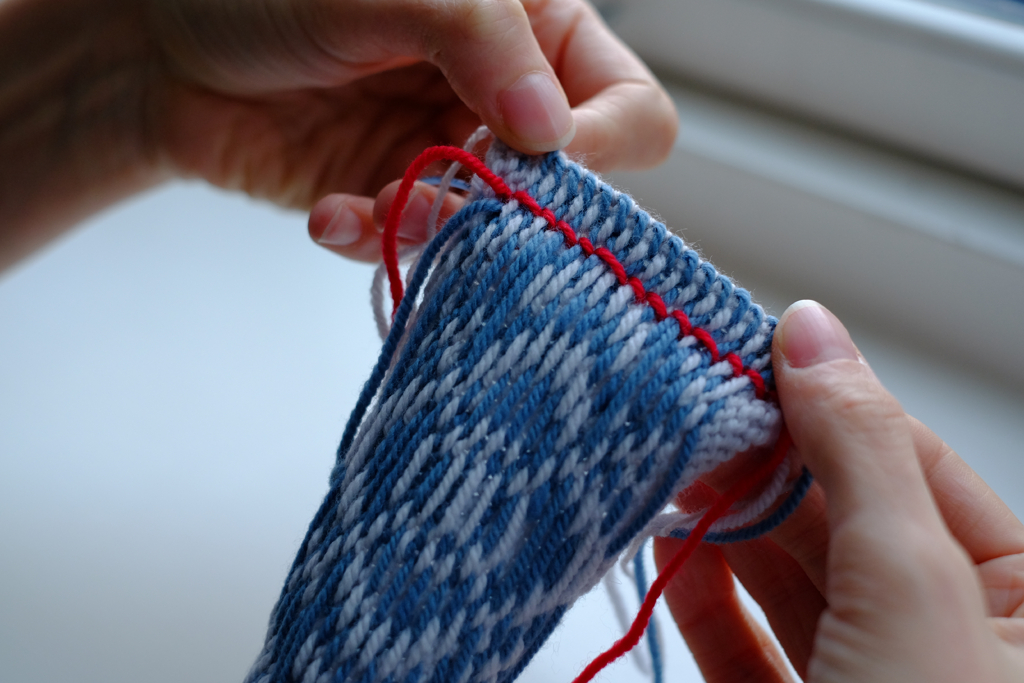
If you run a hand behind your reinforcement stitches, you’ll notice that the fabric wants to fold at the point of reinforcement. Looking closely, gently pulling the two sides apart reveals a line of horizontal ladders between the lines of reinforcement stitches (seen in blue above). These ladders are what we’re going to cut.
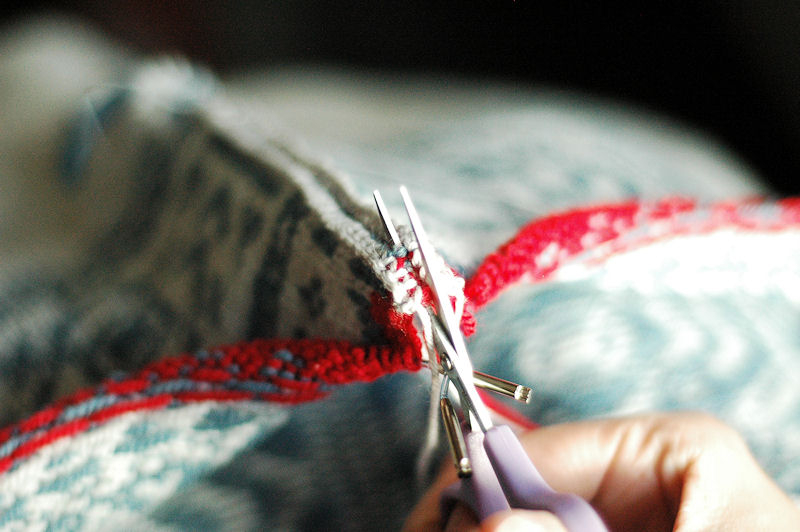
With a small pair of sharp scissors, carefully cut the ladders in between the reinforcement stitches. Be very careful to cut the ladders only, and not the reinforcements.
PART 2: PICKING UP STITCHES & SEWING DOWN EDGES
This section of the tutorial goes over the best method to use to pick up stitches for the sleeve. (Note that by the time I was working on this section of the tutorial, I no longer had the pattern sample in my possession, so this part is worked on a swatch instead – the process, however, is exactly the same).
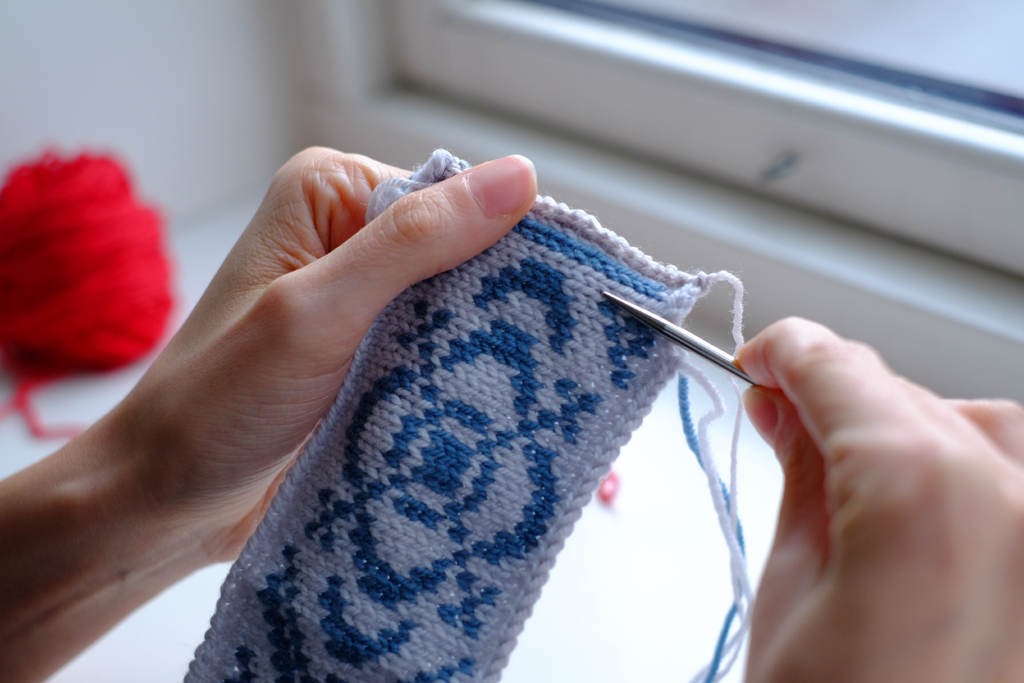
New working yarn will be used to create the picked up stitches. Tie a slip knot in yarn color C in preparation.

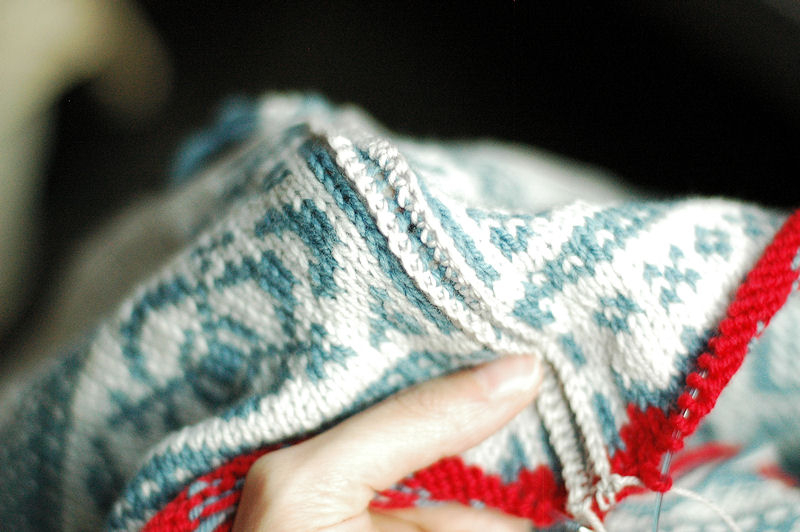
We’ll be picking up new stitches in color C by inserting the needle through the existing fabric between the last stitch of the pattern and the first column of steek stitches, as indicated by the knitting needle in the photo above.

Beginning at the bound off edge (or the shoulder seam), insert your needle in between the last pattern stitch and the outermost steek stitch.
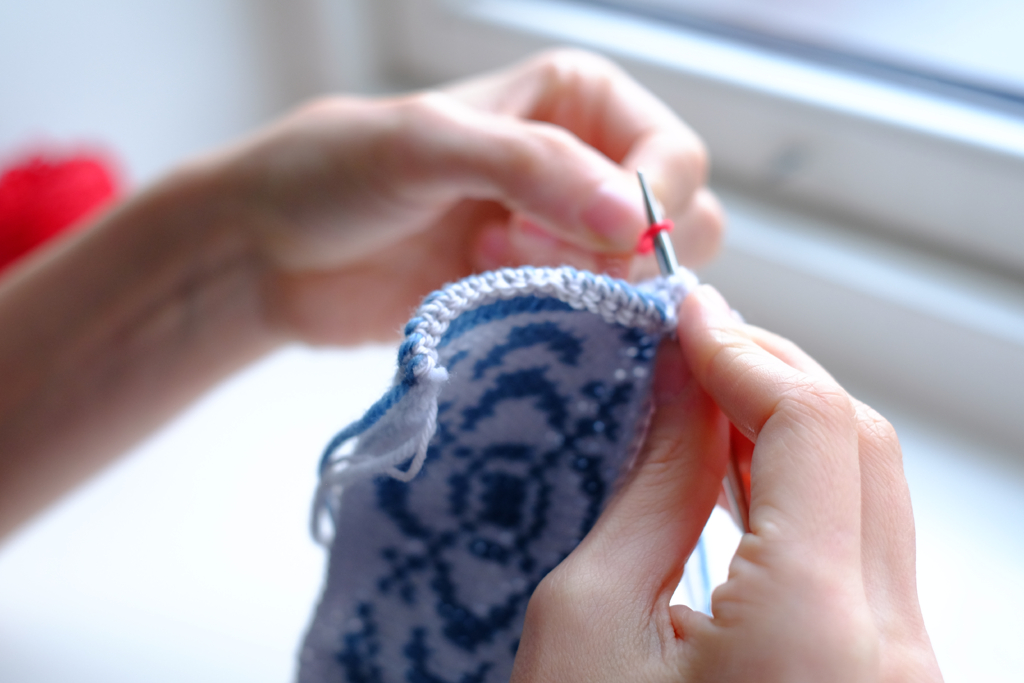
Pick up your first stitch by placing the slip knot on the needle and pulling it through to the right side of the fabric. The slip knot forms your first stitch.

Next, insert the needle into the gap between the pattern stitch and the steek stitch in the row below. Wrap the working yarn around the needle and pull through to the front of the fabric, as if knitting the stitch. There will now be two stitches on the needle, side by side, running perpendicular to the rows of the existing fabric.
For Ebba, you’re instructed to pick up stitches at an approximate rate of 2 stitches for every 3 rows. This means we’ll skip the next row when inserting the needle for the next picked up stitch (another way of visualizing it is to think: if we were numbering rows from the shoulder seam, the first picked up stitch would come through row 1, the second picked up stitch would come through row 2, and row 3 would be skipped, so that the third picked up stitch would come through row 4).
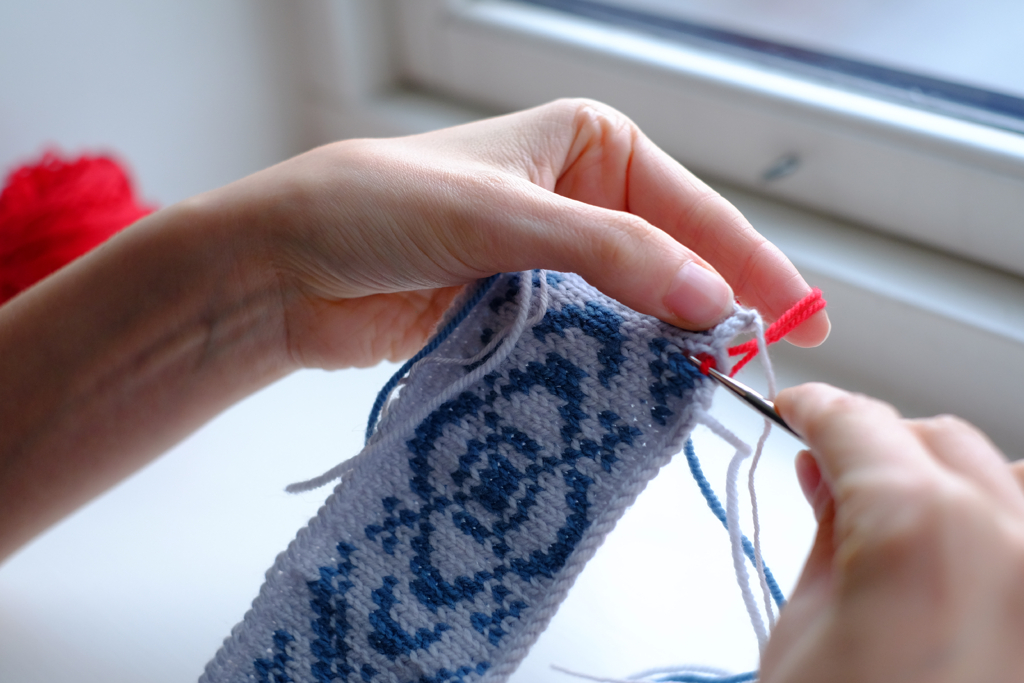
Picking up stitches at this rate means that initially, the new stitches will sit in pairs with gaps in between (as seen in the photos below) but don’t worry – these gaps disappear quite quickly once we start knitting on the sleeves.

Picking up stitches in this manner actually adds extra reinforcement to your fabric, unlike other methods of picking up stitches which can add more stress to the cut edge instead. The picked up stitches form the foundation for the fabric of the sleeve, but the way in which they’re formed means that the working yarn forms a line of what looks like running stitch on the wrong side of the existing fabric.
Much like the crocheted reinforcement, this helps the existing stitches stay in place. It also creates a natural fold, so that the steek edge turns under of its own accord.

This makes it very easy to stitch down and secure when the garment is finished.
While ribbon trims are beautiful and sturdy on the button band of a steeked cardigan, I’d recommend not using a ribbon to cover the cut edges of an armhole steek – while armholes do get a lot of wear, they need to be able to stretch and adapt to your body movements more than a cardigan’s button band, and using an inelastic ribbon to secure your cut edges on a fitted sweater like Ebba can make for a very uncomfortable sweater. A simple hand-sewn zig-zag or whip stitch will hold the edge down while also maintaining elasticity.